Most modern browsers can automatically detect feeds offered by websites with feed autodiscovery enabled. This makes it easier to subscribe to these sites. If your blog doesn’t have feed autodiscovery enabled already, you need to set it up. Why make it harder for people to subscribe to your site?
Checking Whether It Is Enabled On Your Site
Checking whether you already have feed autodiscovery enabled is easy. Simply go to your site using a modern browser and check whether you can see the orange RSS icon in the Web Browser toolbar (not on the page itself).
Below is a screenshot of my site using Firefox. Note the orange feed icon. Internet Explorer 7 has the same icon, but in a different place.

If this icon is present on the toolbar when browsing your site, then you already have feed autodiscovery enabled.
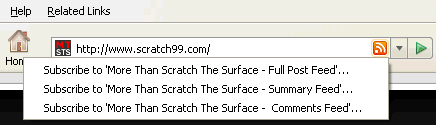
It’s possible to have more than one feed enabled for autodiscovery. If your site has only one feed enabled, clicking the icon will take you to the feed. If there is more than one feed enabled, clicking the icon will show a menu, listing all feeds that have been found (see the following screenshot).
If your main site feed is already enabled, you may choose to enable other feeds, such as the Comments feed or even some of your category feeds. Just add the links you want, as outlined below.
Note: If you’re wondering why I’ve got both a Full Post Feed and a Summary Feed, that’s because I’m using the DualFeeds plugin. If you use DualFeeds, it can enable autodiscovery for you (see Feed Autodiscovery And The DualFeeds Plugin below).
How to Add Feed Autodiscovery Links
To enable a feed for autodiscovery, you need to add a link to it in the head section of your page’s HTML (between <head> and </head>). Ideally you should add this to all pages on your site.
An example of the link you need to add is as follows:
<link rel="alternate" type="application/rss+xml" title="Your Site Name RSS Feed" href="http://www.yoursite.com/feed" />
Obviously you need to replace "Your Site Name" with the name of your site and you need to replace http://www.yoursite.com/feed with your feed url.
If you wish to enable more than one feed, simply add a link for each one.
How you add these links to your pages will depend on which blogging platform you use. I outline how to do this in WordPress below.
What About FeedBurner?
If you use FeedBurner, you have the choice of using your site’s normal feed URLs or the related FeedBurner URLs.
If you use a FeedBurner redirection plugin, such as FeedBurner’s FeedSmith plugin or Flagrant Disregard’s Feedburner Plugin, I recommend using your site’s normal feed URLs, not the FeedBurner ones. The redirection plugin will redirect your normal URLs to the FeedBurner ones for you and if you ever stop using FeedBurner, there’ll be no need to change the autodiscovery links.
If you don’t use such a plugin, you need to use the FeedBurner URLs. If you ever stop using FeedBurner, you’ll have to change the autodiscovery links.
Setting Up The Links In WordPress
For WordPress users, the feed autodiscovery links should be added to the header.php file in your theme directory, as follows:
- Download
header.phpfrom thewp-content/themes/yourthemefolder, using an FTP program - Make a copy of the file, in case you make a mistake
- Use a text editor to make the changes below
- When finished, save the file, then FTP it back up to the server, overwriting the original
It’s possible to do this via the Theme Editor in the Presentation menu of the WordPress Admin area, if you have the correct permissions. Personally, I do not recommend this, because you don’t have a copy of the file to restore if something goes wrong.
Changes to header.php (for step 3):
If autodiscovery is already enabled, find the following line (it may differ slightly depending on your theme) and add links to any extra feeds below it:
<link rel="alternate" type="application/rss+xml" title=" RSS Feed" href="" />
If you don’t have autodiscovery enabled, look for the </head> tag and add links to any extra feeds on the line immediately BEFORE this.
To add the links, use the format outlined above, eg:
<link rel="alternate" type="application/rss+xml" title="Your Site Name RSS Feed" href="http://www.yoursite.com/feed" />
Remember to change the details to reflect the title and URL for your site.
<link rel="alternate" type="application/rss+xml" title=" RSS Feed" href="" />
<link rel="alternate" type="application/rss+xml" title=" Comments Feed" href="" />
Feed Autodiscovery And The DualFeeds Plugin
For users of my DualFeeds plugin (v1.1 & above) for WordPress, the good news is that you don’t need to set this up manually. DualFeeds can create the feed autodiscovery links for you. You simply turn on the appropriate parameters in the DualFeeds Options page in the WordPress Admin area.
Note: It’s likely that the main site feed (and maybe the comment feed) are already set up. You need to check if this is the case (as per Checking Whether It Is Enabled On Your Site above). Make sure you only turn on the DualFeeds parameters for those that doesn’t already exist, or you will get duplicates.
The Final Word
You want as many subscribers as possible, so make it easy for people to subscribe. Make sure that feed autodiscovery is turned on for your main site feed. Consider adding other feeds that readers may find useful. Make your feeds more accessible!
very useful tip, I am implementing it in my blogs.
Excellent post, Stephen! I have to add my comments feed to be auto discovery enabled. I am sure that’ll give it a little boost in subscribers and may be increased interaction with my readers.
Stumbled! 🙂
Thiru, Thanks.
K, Every little bit helps, that’s my thinking. Thanks for the Stumble!
WOW. That sounds very cool features. I have never thought about the autodiscovery in RSS FEED.
Great job!
Hi Terence, to be honest I hadn’t thought about it either until I was writing the DualFeeds plugin. But it makes good sense to add it.
Thanks for the great article. My theme I was using already had it included, but its very good to know. I never realized how firefox and readers autodiscovered feeds until I actually looked at my header.php and saw it finally. I am leaving my comments feed off of autodiscovery, but the posts feed will remain and be discovered.
Thank you for these valuable information, you discuss how to make feed, I am looking for an article or information about places that can view my feed, and how can I get the best exposure from my feed.
Great post. I am amazed how many people never check and see if they are using rss feed or auto discovery is being used. The idea of having mutiple ones listed is another great point.
Great tips i did not know you could use dual feeds and have automatic discovery for more than one. I like the idea of giving people a choice of full post or summary.
WordPress is helping with this automatically, but since I modified the default theme to my end, I lost track of this, but soon I figured out how to do it! This is very important as in many programs like entrecard, they look for your feed through that and if it is not working then you lose the traffic you might have gotten through the feed!
I guess the same could be said about placing the subribe to my feed button on your blog. Some sites place it at the bottom of the page and sometimes it is only a simple text link. That is making it far harder to subscribe. If oyu have a prominent noticable button at the top of your page then it is just as good.
A well placed rss button is a lot more effective than this although I guess every little bit helps. thanks for the tip.
I never even look at that anymore. I look at the rss feed they use if i like the site. I guess it would help get more people to subscribe to your feed but not sure how many more.
Interesting post. Although I knew about this feature of web browsers I had never take it into account. I have to implement this auto discovery code in my web site. Thanks for a useful article!
LINK REMOVED: because of failure to use KeywordLuv syntax (name@keywords)
Wow, very interesting post. I know most of these tips, but I Still bookmarked it 🙂