The other day a great comment was left on this site. When I went to answer, I realized that I wanted to be able to select part of what the commentator said and automatically turn it into a quote in my comment.
Copy and paste are too mundane for me, so I wrote a Greasemonkey script that adds the markItUp! Editor to any textarea on a page. I then extended markItUp! by adding a ‘quote’ button that wraps the currently selected text (from anywhere on the page) in blockquote tags.
Why A Greasemonkey Script?
I’m pretty sure that there’s a WordPress plugin somewhere that allows you to automatically add quotes to comment replies. As the comment I wanted to quote was on my site, which is powered by WordPress, I could have used this.
However, I realized that I wanted this functionality to be available on any site I was leaving a comment on, not just my own. I know there is a Firefox add-on that adds a HTML editor, but I wasn’t that impressed when I tried it and I don’t think it ‘quotes’ the selected text from anywhere on the page.
In that context, a Greasemonkey script seemed to be the answer. I just needed to find an editor to embed.
Enter markItUp!
I looked at quite a few editors, but markItUp! stood out for me because:
- It provides the main HTML markup options I need: strong, em, lists, links, images (although it doesn’t include blockquotes, by default).
- It’s easily extensible, allowing me to add the blockquote functionality.
- It’s based on jQuery, which is my preferred JavaScript framework.
- It’s open source (Dual licensed under the MIT and GPL licenses), allowing me to embed it in a Greasemonkey script.
MarkItUp is NOT a WYSIWYG (What You See Is What You Get) Editor. It just helps add markup, in this case HTML, to a textarea. If you make the word Greasemonkey bold, you will see <strong>Greasemonkey</strong> rather than Greasemonkey – although there is a preview function which renders the markup allowing you to see what it will look like.
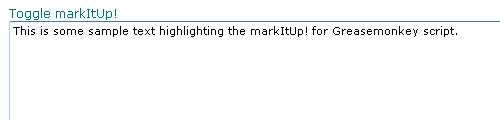
Turning markItUp! On
The script runs on all pages you visit, but it doesn’t turn markItUp! on automatically. Instead it creates a "Toggle markItUp!" link immediately before any textarea, as follows:
Once you click this, markItUp! is turned on for that textarea and you’ll see the markItUp! editor:
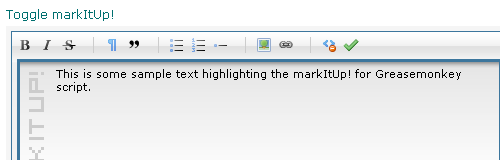
markItUp! can be turned on for multiple textareas at the same time, but each one needs to be turned on individually.
Functions Included
This implementation of markItUp! includes the following functions:
- Bold: wrap the selected text in <strong> tags
- Italic: wrap the selected text in <em> tags
- Strike through: wrap the selected text in <del> tags
- Paragraph: wrap the selected text in <p> tags
- Blockquote: wrap the selected text (from anywhere on the page) in <blockquote> tags
- Unordered lists: wrap the selected text in <ul> tags
- Ordered lists: wrap the selected text in <ol> tags
- List element: wrap the selected text in <li> tags
- Picture: insert an image
- Link: insert a link
- Clean: remove HTML tags from the selected text
- Preview: show a preview of how the markup will be rendered
Example
As an example, to make something bold, first select the text you want to make bold:
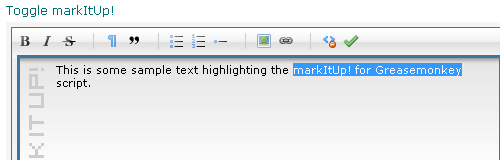
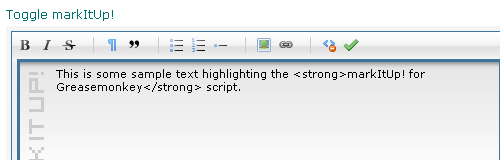
Then click the B icon and the selected text will be wrapped it in <strong> tags:
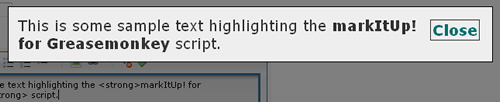
To see how this will be rendered, click the Preview icon (the green check mark):
Technical Notes
For those that are interested, here are some technical notes related to creating the script.
The following scripts are embedded in the Greasemonkey script:
I’m a great believer of embedding scripts in a Greasemonkey script – these scripts then live in the browser and don’t have to be downloaded on page load. I plan to write more about this approach at some point. Ozh questioned this approach (fair enough given how simple the script in question was), but according to Remy Sharp there have been discussions about whether browsers should be preloading jQuery into the browser, which shows I’m not alone in my thinking.
I used the Greasemonkey function GM_addStyle() to add the CSS for both markItUp! and jqModal. For markItUp!, I went a step further and used Daily Coding’s Online Image to Base64 Converter to convert the images for icons etc into base64 encoded images. This allowed the CSS and images to be embedded in the script itself, rather than living in external files that have to be stored somewhere (they can’t live in Greasemonkey).
I wrote a Quote function that grabs the currently selected text (from anywhere on the page), wraps it in blockquote tags and inserts it at the current cursor location in the textarea. If there’s nothing selected on the page, it grabs whatever is selected in the textarea itself and wraps that in blockquote tags.
The default Preview function in markItUp! wouldn’t work as it relies on using an IFrame to load an external file which it then manipulates. Once again, the external file can’t be stored within a Greasemonkey script. I therefore wrote my own Preview function, which uses jqModal to display the text in a modal dialog. The styles in the Preview probably won’t be exactly the same as the final comment, but it allows you to check if links, lists, etc are correct.
Where Do I Get It?
Downnload it from userscripts.org.
This is brilliant, I stopped using greasemonkey because I wasn’t finding a lot of value on some of the scripts floating around and I don’t have the time to try to come up with my own, but this is great, I might just turn on gm again just to try this out. I also think this approach is better than a plugin because like you said, you can do it on “any” website. Awesome.
Interesting article. I think I will probably stick to copy/pasting for now. But if I ever find the need for this, I will come back to this. Thanks for doing this!
Nice One!! I’ve written many utilities during my years as a programmer. I’m sure many of them save people a lot of time and money – it’s a real shame that one can never earn a bean from them!!! Never mind – nothing quite like a bit of community-spirit mindedness!!
It certaibly makes editing a lot easier with a “wysiwyg” like editor.
good
I love you!
I’m now using this on Google Chrome. I use a ubiquity extension on Firefox, but was really missing for me.
Now I can use Google Chrome full time!
Interesting plugin but it does not work with all text areas. I have a text area that has a couple buttons above and a preview button at the bottom and after I install the script I could not see the toggle link. BTW I can not see the toggle link in this blog post either. I have seen the toggle like in some text areas and the script works fine in those. I use to use the Firefox addon BBCode but today I installed FF 4.0 and FF disabled BBCode. Can anyone recommend something similar to BBCode? I like the ability to customize the “formatting/markup/template” like I can do in BBCode. I also like the ability to select text in the text area and apply my custom template.
Thanks!